Did you know 65% of home theater enthusiasts prefer elevated installations for immersive screen experiences? Strategic positioning isn’t just for commercial spaces – it’s reshaping how families enjoy movies and games at home.

Elevating your entertainment system offers more than crisp visuals. It clears floor space while creating a polished, theater-like environment. Properly positioned devices reduce glare and deliver consistent image quality across seating areas.
This setup eliminates tripping hazards from loose cables and unstable stands. Families gain safer navigation in multipurpose rooms. The elevated design also minimizes accidental bumps during daily activities.
Belangrijkste opmerkingen
- Space-saving installations create cleaner living areas
- Professional-grade aesthetics enhance room design
- Optimal height improves picture clarity for all viewers
- Secure mounting prevents accidents and device damage
- Permanent positioning simplifies future media sessions
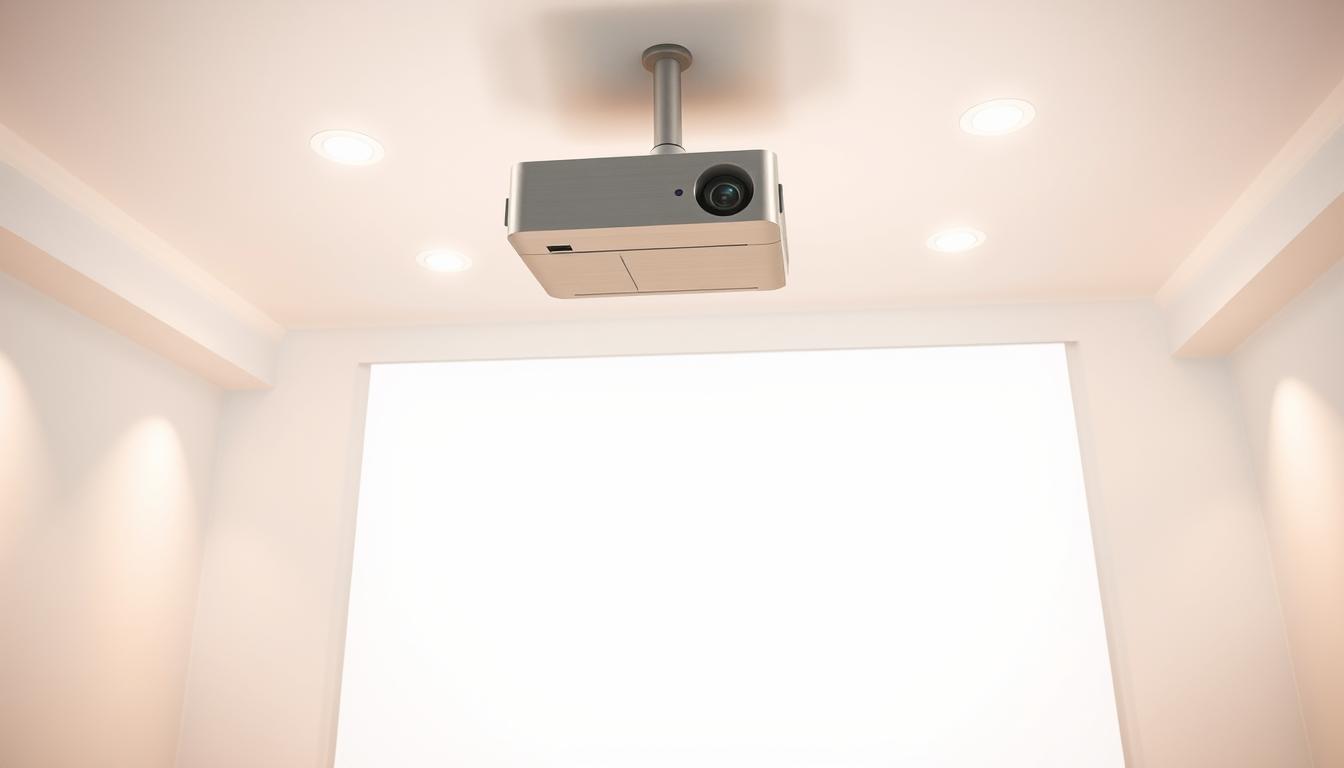
Benefits of Ceiling Mounting Your Projector
Elevated installations transform living areas into sleek entertainment zones while solving common placement challenges. This approach blends technology with interior design, creating functional spaces that adapt to modern lifestyles.
Streamlined Room Design
Wall-mounted units and table setups often disrupt room flow. Suspended installations maintain sightlines across seating areas. Equipment disappears into architecture, preserving your space’s original character.
Maximizing Safety and Floor Areas
Floating devices prevent tripping hazards from cables or stands. Three key advantages emerge:
- Children and pets can’t reach sensitive components
- Walkways remain unobstructed during movie nights
- Furniture surfaces stay clear for daily use
Proper height alignment reduces image distortion compared to angled table setups. Viewers enjoy consistent picture quality without adjusting seating positions. This positioning also prevents accidental spills from damaging expensive electronics.
Understanding Home Theater Setup Essentials
Creating cinematic magic in your living space demands careful planning. Three critical factors determine success: light control, screen positioning, and precise distance calculations.
Screen Placement and Ambient Light Considerations
Natural and artificial lighting dramatically impacts image quality. Sunlight or lamps create washed-out colors and reduce contrast ratios. Ideal rooms feature blackout curtains or controlled LED lighting.
Position your projection screen opposite windows and away from reflective surfaces. Glossy walls or glass tables can distort visuals. Matte finishes absorb excess light for sharper details.
- Test room brightness at different times
- Use light-absorbing materials near screens
- Install adjustable dimmer switches
Importance of Throw Ratio and Throw Distance
Projector specifications determine placement flexibility. The throw ratio (TR) formula ensures proper image sizing:
Throw Distance = TR × Screen Width
Short-throw models (0.4:1 ratio) work in compact spaces. Long-throw units (2.0:1+) need more ceiling depth. Always measure room dimensions before choosing equipment.
- Ultra-short: 3-8 feet from screen
- Standard: 8-15 feet
- Long-range: 15+ feet
These fundamentals prevent blurred images and equipment mismatches. Proper calculations save time during installation and ensure theater-quality results.
Equipment and Accessories for a Successful Installation
A successful setup begins with gathering essential equipment. Precision instruments and compatible hardware form the foundation of stable, long-lasting installations. Proper preparation prevents last-minute scrambles for missing components.

Tools Needed: From Drill to Tape Measure
Seven core tools streamline the process. A sturdy ladder provides safe ceiling access. Measuring tapes and levels ensure accurate alignment. Marking pencils note drilling points, while power tools create anchor points. Fastening requires screwdrivers and wrenches.
| Tool | Purpose | Critical Feature |
|---|---|---|
| Laser Level | Horizontal alignment | Self-leveling function |
| Stud Finder | Locate joists | Deep scanning mode |
| Impact Drill | Create pilot holes | Variable torque settings |
Choosing the Right Mounting Bracket and Hardware Kit
Bracket selection impacts stability and adjustability. Always verify weight ratings against your device’s specifications. Manufacturer-specific kits often include custom adapters for perfect fits.
| Mount Type | Beste voor | Load Capacity |
|---|---|---|
| Universal | Multi-brand compatibility | Up to 35 lbs |
| Brand-Specific | Precision alignment | 50+ lbs |
Hardware kits vary by ceiling material. Drywall installations need toggle bolts, while concrete requires wedge anchors. Double-check included components against your room’s structural needs.
Assessing Your Room and Projector Placement
Proper media room evaluation starts with spatial analysis. Identify permanent fixtures like chandeliers or vents that might block projection paths. Measure wall-to-wall distances to confirm available adjustment ranges.

Measuring Ceiling Height and Determining Screen Center
Begin by locating your screen’s midpoint. Follow these steps for precise alignment:
- Mark the screen’s top edge on the wall
- Measure downward to find vertical center
- Use a laser level to extend horizontal reference lines
Calculate throw distance using your projector’s manual. Multiply screen width by the device’s throw ratio. This determines how far the unit needs from the viewing surface.
| Ceiling Type | Installation Tip | Key Consideration |
|---|---|---|
| Drywall | Use toggle anchors | Verify joist locations |
| Concrete | Requires masonry bits | Allow cooling breaks during drilling |
| Exposed Beams | Clamp-mounted brackets | Check load-bearing capacity |
Furniture layout impacts sightlines. Ensure seating areas maintain 30-40 degree viewing angles from the screen. Test different chair positions during daylight and evening hours for optimal results.
How to Mount a Projector on the Ceiling Safely
Precision and safety form the foundation of reliable elevated installations. Following manufacturer guidelines while accounting for structural variables ensures lasting performance without compromising room integrity.
Step-by-Step Installation Process
- Locate ceiling joists using a stud finder, marking positions with painter’s tape
- Align bracket holes with joist locations for maximum load capacity
- Drill pilot holes 1/8″ smaller than fastener diameter to prevent splitting

- Secure bracket base using T-nuts or toggle bolts based on ceiling material
- Confirm vertical alignment with a 4-foot level before final tightening
- Perform pull-test with 2x device weight for stability verification
Ensuring Secure Attachment to Ceiling Joists
Structural support matters more than aesthetics when anchoring heavy equipment. Always prioritize joist alignment over perfect centering. For non-joist installations, use spreader plates to distribute weight across multiple beams.
| Anchor Type | Material Compatibility | Weight Capacity |
|---|---|---|
| Toggle Bolts | Drywall | 50 lbs |
| Wedge Anchors | Concrete | 200 lbs |
| Lag Screws | Wood Joists | 150 lbs |
Safety protocols during installation:
- Maintain three-point contact on ladders
- Wear ANSI-approved safety goggles
- Disconnect power sources before routing cables
Calculating Optimal Throw Distance and Screen Size
Achieving crystal-clear images starts with precise mathematical planning. Projection quality depends on balancing your device’s specifications with room dimensions. This calculation process ensures sharp focus and proper image scaling.
Using Projection Calculators and Formulas
The core formula simplifies complex geometry: Throw Distance = Throw Ratio × Screen Width. For XGIMI’s X3100i model (1.15-1.50 ratio), a 100-inch screen (87″ width) requires 8.7-13.05 feet between lens and surface.
Always measure from the lens front – not the mount. Ceiling brackets often sit 6-12 inches behind this critical point. Digital tools like XGIMI’s calculator auto-adjust for lens offsets and screen aspect ratios.
| Throw Ratio Range | Ideal Room Size | Example Models |
|---|---|---|
| 0.25:1 – 0.5:1 | Small spaces (under 12ft) | Epson LS300 |
| 1.0:1 – 1.5:1 | Medium rooms (12-18ft) | XGIMI X3100i |
| 2.0:1+ | Large theaters (18ft+) | Sony VPL-VW715ES |
Common errors include mixing diagonal/width measurements and ignoring vertical offsets. Verify inputs twice before drilling. Test placements temporarily using adjustable tripods to confirm sightlines.
Installation Techniques and Practical Tips
Perfect visual alignment separates amateur setups from professional-grade installations. Precision adjustments ensure crisp visuals without compromising picture integrity. This process demands patience and systematic testing.
Aligning the Projector for a Centered Image
Begin by securing the bracket to structural supports. If the lens doesn’t align with the screen’s center, adjust the mount’s extension arm. Mechanical adjustments preserve image quality better than digital keystone correction.
Activate your device and display a grid pattern. Use these steps for optimal results:
- Rotate the lens until horizontal lines appear parallel
- Adjust vertical tilt to eliminate trapezoid distortion
- Fine-tune pan controls for perfect left-right balance
| Adjustment Type | Function | Visual Impact |
|---|---|---|
| Vertical Shift | Moves image up/down | Corrects height mismatches |
| Horizontal Offset | Aligns side borders | Fixes skewed edges |
| Lens Rotation | Adjusts angular tilt | Eliminates leaning effect |
Professional installers recommend temporary testing with tripods before permanent mounting. This allows easy repositioning during calibration. Always prioritize physical alignment over software fixes to maintain native resolution quality.
For challenging spaces, use laser pointers to map projection paths. Mark reference points on the ceiling for repeatable adjustments. These techniques ensure consistent performance across movie nights and gaming sessions.
Cable Management and Clean Wiring Strategies
Neat wiring transforms entertainment spaces by enhancing both function and style. Thoughtful organization prevents visual clutter while protecting connections from accidental tugs or pet damage. Let’s explore solutions that maintain your room’s aesthetic appeal.
Concealing Cables for a Tidy Look
Three popular methods hide wires effectively:
- In-wall routing for permanent installations
- Painting-grade channels matching wall colors
- Crown molding with built-in cable pathways
Power and HDMI lines require different handling. Use UL-rated conduits for electrical wiring. Low-voltage cables like HDMI benefit from flexible sleeves. Always maintain 12-inch separation between power and signal lines to prevent interference.
| Cable Type | Best Concealment Method | Safety Note |
|---|---|---|
| Power | Metal conduit | Requires circuit breaker access |
| HDMI 2.1 | Flexible raceway | Avoid sharp bends |
| Ethernet | Baseboard channels | Keep away from moisture |
Plan routes before mounting hardware. Map paths from devices to screens using blue painter’s tape. Consider future upgrades – leave service loops behind walls for easy replacements. For concrete surfaces, surface-mounted tracks offer non-invasive solutions.
Safety remains paramount. Use 14-gauge wire for 15-amp circuits. Consult local codes when routing through fireblocks. Label both ends of every cable with colored tape for quick identification during maintenance.
Troubleshooting Common Mounting and Performance Issues
Even the best installations can face unexpected hiccups. Most issues have simple fixes that maintain your theater’s performance. Let’s resolve common challenges efficiently.
Image misalignment often stems from shifted brackets. Adjust horizontal and vertical knobs on the mount while projecting a grid pattern. Fine-tune until edges align perfectly with your screen borders. This avoids removing the unit from its position.
Blurry visuals usually mean dirty lenses or incorrect settings. Clean optics with microfiber cloths first. Then cycle through focus and zoom controls. If text remains fuzzy, verify the throw distance matches your room dimensions.
Dim projections struggle against daytime glare. Install blackout curtains if sunlight floods the space. For permanent setups, consider upgrading to 3,000+ lumen models. These handle ambient light better while preserving color accuracy.
Overheating units need airflow improvements. Ensure at least 6 inches of clearance above vents. Check intake filters monthly for dust buildup. Position away from insulation pockets in drop ceilings.
Regular maintenance prevents recurring problems. Test connections quarterly and recalibrate annually. Your elevated system will deliver cinema-quality experiences for years with proper care.
FAQ
What tools are essential for installing a ceiling-mounted projector?
A drill, stud finder, tape measure, screwdriver, and mounting bracket kit are critical. Ensure the hardware matches your projector’s weight and ceiling type. Brands like Peerless-AV or Chief Mounts offer durable brackets for varied setups.
How does throw ratio impact screen size and placement?
Throw ratio determines the distance between the projector lens and screen relative to image width. For example, a 1.5:1 ratio means 1.5 feet of distance per foot of screen width. Use Epson’s or BenQ’s projection calculators for precise measurements.
Can ambient light affect projector performance?
Yes. Bright rooms require high-lumen projectors (2,500+ ANSI) or ambient-light-rejecting screens like Elite Screens’ CineGrey. Position screens away from windows and use blackout curtains to minimize glare.
How do I locate ceiling joists for secure mounting?
Use a stud finder to detect joists, typically spaced 16-24 inches apart. For concrete ceilings, opt for toggle bolts or anchors. Brands like Bosch offer reliable stud sensors for accurate detection.
What’s the best way to hide cables for a clean setup?
Run HDMI or power cables through paintable wire channels (like D-Line’s) or in-wall conduits. For wireless setups, consider HDBaseT extenders from brands like AV Access to reduce clutter.
How do I align the projector with the screen center?
Adjust the mount’s tilt and horizontal shift while projecting a test pattern. Use the projector’s lens shift feature (available in models like Sony VPL-HW45ES) for finer alignment without keystone correction.
What if my throw distance doesn’t match room dimensions?
Choose a short-throw projector (e.g., Optoma GT1090HDR) for tight spaces or relocate the screen. Rearrange furniture or consider a motorized screen that adjusts to available space.
Can I install a ceiling mount without professional help?
Yes, if you follow the manual’s instructions, use a partner for lifting, and verify load capacity. Sanus’ DIY-friendly mounts include detailed templates and pre-assembled parts for easier installation.

 Geen producten in de winkelwagen.